Radhika Vachani, Founder of Yogacara Healing Arts takes you through it.
The great thing about yoga is even a short routine centres the mind, balances the body and gets the energy flowing.
And it is wakes you up far more effectively than any cup of tea or coffee.
Follow this short sequence. Not only will you feel really good, flowing with energy and focused, but several of these asanas will stretch your muscles and srengthen and tone your arms, shoulders, and legs.
Nadi Shodhana Pranayama: Alternate Nostril Breathing
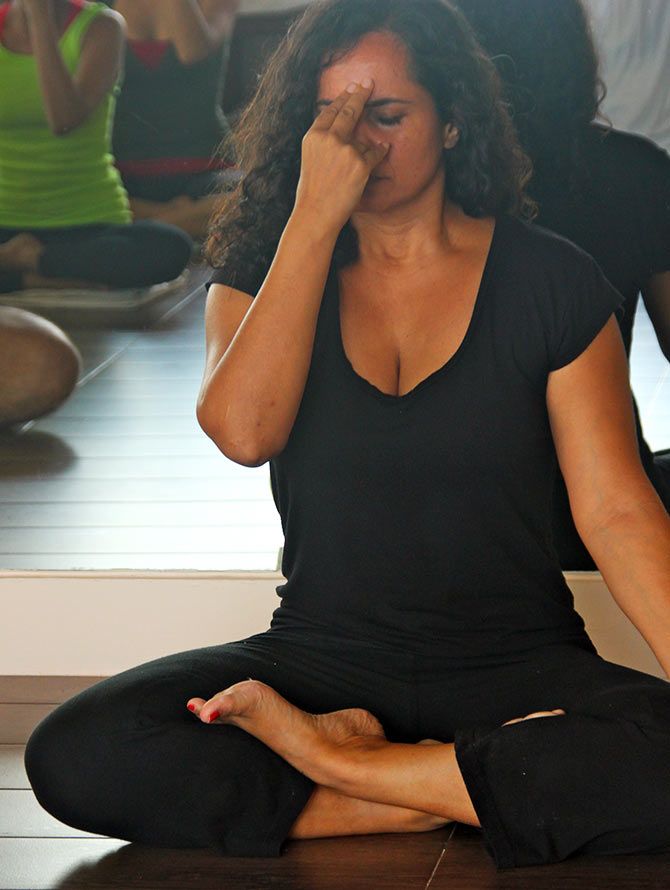
Start with your breath as it is the best way to balance your mind and help you focus, and make your practice more inwardly focused.
- Sit in any meditative pose. Place your left hand in chin mudra, with the tip of your index finger touching the tip of your thumb.
- Place the right hand in nasagra (nosetip) mudra, using the remaining fingers to shut and open the nostrils as instructed.
- Close your eyes; shut your left nostril and fully exhale very slowly from the right nostril.
- Then inhale again slowly from the right nostril drawing your lungs to full capacity
- When your lungs are full, shut both nostrils momentarily and exhale through the left nostril very slowly while keeping the right nostril shut.
- Inhale back up through the left nostril slowly, and when the lungs are full, shut both nostrils momentarily, exhale through the right nostril slowly while keeping the left nostril shut.
- This completes one round. Do a total of ten rounds.
Benefits
- Calms and centres the mind and enables one to enter a meditative state
- Releases the accumulated stress in the mind and body
- Helps harmonise the left and right hemispheres of the brain
- Helps purify and balance the nadis, the subtle energy channels, ensuring smooth flow of prana (life force) through the body.
Now chant 'Om' out loudly three times to further focus your mind and get ready for your practice.
2. Balasana: Child pose
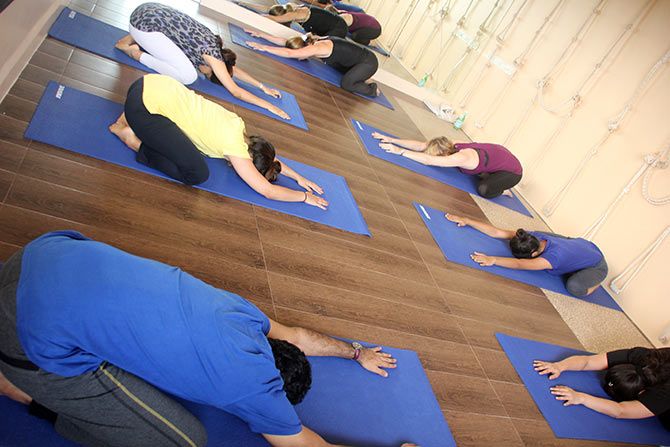
- Sit on your heels, keeping your buttocks on the heels, with your knees wide apart
- Slowly exhale and bend forward, lowering your forehead to the floor.
- Make sure your buttocks remain on the heels, and if they don't you can even put a pillow between your heels and buttocks.
- Try to reach your forehead to the ground, but not at the expense of the buttocks lifting off the heels.
- Stretch your arms in front of you, stretching your fingers forward.
- Gently press your chest on the thighs, and stretch your spine as your buttocks press onto the heels and the fingers and arms lengthen forward.
- Hold and breathe very slowly staying for 5-10 slow breaths
- Slowly come up to sit on the heels, uncurling vertebra by vertebra and relax.
Benefits
- Deeply relaxing and calms the mind and mental energies.
- Stretches the back, relieves compression in the vertebrae, and opens the hips and pelvic region.
- Relieves constipation.
- Balances the nervous system.
Precautions
- In case of serious back or knee injuries avoid this pose.
- Pregnant women who are in their latter trimesters should avoid doing this pose.
3. Marjariasana: Cat Pose
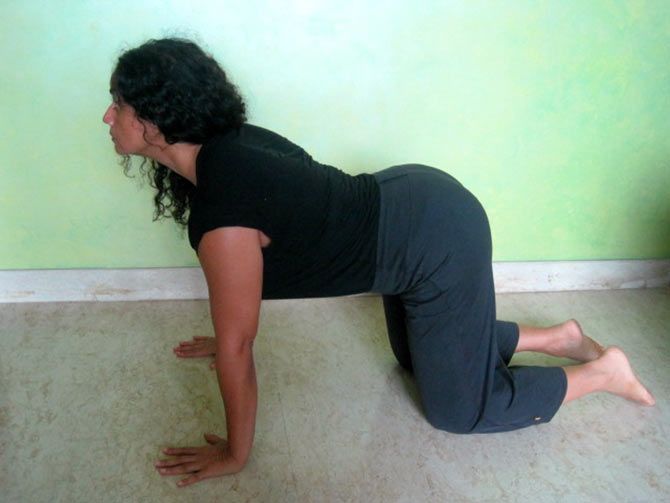
- Get on to your fours.
- Form a table such that your back forms the table top and your hands and feet form the legs of the table.
- Keep your arms perpendicular to the floor, with the hands directly under the shoulders and flat on the ground; your knees are hip-width apart.
- Look straight ahead.
- As you inhale, raise your chin and tilt your head back, push your navel downwards and raise your tailbone.
- Tighten your buttocks. Do you feel a slight tingle here?
- Hold the position and take long, deep breaths.
- Follow this by a countermovement: As you exhale, drop your chin to your chest and arch your back up as much as you can; relax the buttocks.
- Hold this pose for a few seconds before you return to the initial table-like stage.
- Continue five or six rounds before you come out of this yoga posture.
Tip from the Art of Living Yoga expert:
- When you do the movement slowly and gracefully, its effect is more powerful and meditative.
Benefits
- Brings flexibility to the spine and neck.
- Strengthens wrists and opens the shoulders.
- Massages the abdominal organs and improves digestion.
- Improves blood circulation.
Precautions
- Move very slowly if you have back- or neck-related problems
4. Adho mukha svanasana: downward dog
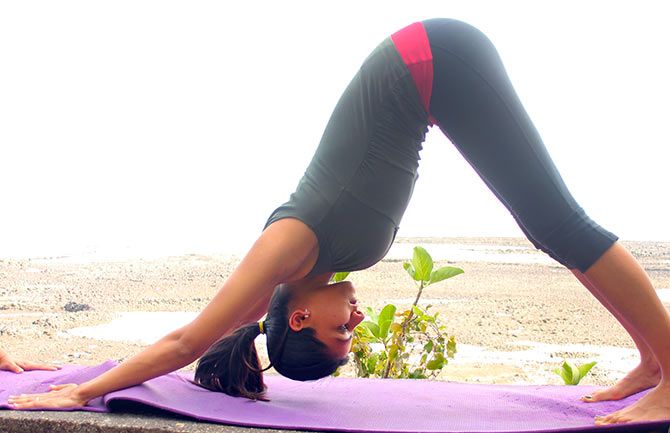
- Adho mukha savasana is an important foundational pose in yoga that not only calms and relaxes, but it stretches and tones the entire body.
- This asana is also fantastic for runners.
- Get on to your fours.
- Form a table such that your back forms the table-top and your hands and feet form the legs of the table.
- As you breathe out lift the hips up, straightening the knees and elbows, form an inverted V-shape with the body.
- Hands are shoulder width apart, feet are hip distance apart and parallel to each other.
- Toes turn slightly in, and heels slightly out.
- Press your palms into the ground.
- Widen through the shoulder blades.
- Keep the neck lengthened by touching the ears to the inner arms.
- Ensure your index and big thumb are pressing into the ground.
- Draw the energy from the up your arms and down your legs
- The front of the things should be moving into the back of the thighs, try not to bend your knees but keep your legs straight
- Hold the downward dog pose and take long deep breaths.
- Look towards the navel.
- If your back is very rounded and stiff, put your heels against a wall and your toes on the ground.
- Exhale. Bend the knees, step forward and relax, moving immediately into the next posture.
Benefits
- Strengthens and tones the arms, shoulders, and legs.
- Practicing regularly helps aid digestion
- Relieves back pain, and strengthens the spine
- Re-energises the body when exhausted.
- Rejuvenates brain cells and brings healthy blood flow to the brain.
Precautions
- Avoid during pregnancy in late term, and those suffering from diarrhea
5. Uthanasana: Standing forward bend
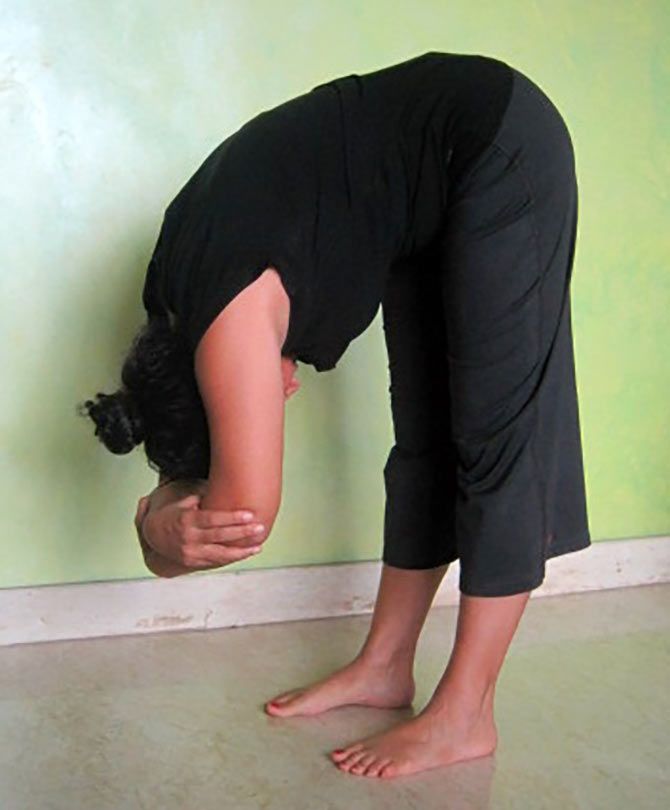
- Stand straight with feet hip distance apart and arms alongside the body.
- Balance your weight equally on both feet, drop your tailbone towards the ground and draw your knees into your thighs
- Breathing in, extend your arms overhead.
- Breathing out, bend forward and down towards the feet.
- Keep the legs and spine straight; hands rest either on the floor, or interlock your elbows over you head, forming a square
- Each time you exhale, move the chest towards the knees and the navel into the spine; lift the hips and tailbone higher; press the heels down;
- Make sure your weight is in the front foot and not leaning into the heels, draw the knees into the thighs
- Keep breathing deeply and stay for 5 breaths
- Breathing in, stretch your arms forward and up, slowly come up to the standing position.
- Breathing out, bring the arms to the sides.
- If this is too difficult you can bend forward and keep your hands on a table so you come into a half forward bend. In this case your body should form a nice reverse L shape.
Benefits
- Stretches all the muscles of the back, and spinal nerves are rejuvenated, and spine supple.
- Invigorates the nervous system by increasing the blood supply.
- Tones the abdominal organs, relieves stomach pain and tones the liver.
- Soothes the mind, brings mental peace.
- Lowers the heartbeat, and releases stress.
- Helps with depression if done regularly.
- Reduces stomach aches.
Precautions
- People suffering from lower back injuries, spondylitis, cervical pain or any kind of back and spinal problems and vertigo should not do this pose.
6. Virabhadrasana 2: Warrior Pose
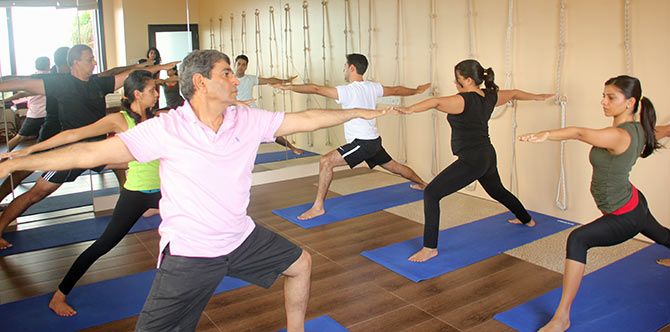
This pose is named after Veerabhadra, a fierce warrior, an incarnation of Lord Shiva.
- Stand straight with your legs wide apart by a distance of at least 3-4 feet.
- Turn your right foot out by 90 degrees and left foot in by about 10 degrees.
- Align the heels of each foot
- Now put your left hand on your left hip, and press your hip down until your right knees move into a 90 degree angle over your ankles.
- Your knees should be in line with your ankle and not extending beyond the ankle.
- Also make sure that your knees and your tows are pointing in the same direction.
- Now inhale and slowly lift both arms sideways to shoulder height with your palms facing downwards and parallel to the ground.
- Turn your head and gaze at middle finger keeping your mind focused.
- As you settle down in the yoga posture stretch your arms further.
- Make a gentle effort to push your pelvis down.
- Hold the yoga posture with the determination of a warrior.
- Draw the breath up from the navel, inhaling and exhaling very slowly.
- Breathing in, come up slowly.
- Breathing out, bring your hands down from the sides.
- Repeat the yoga posture for the left side (turn your left foot out by 90 degrees and turn the right foot in by about 10 degrees).
Benefits
- Strengthens and tones the arms, legs and lower back.
- Helps increase stamina and focus.
- Releases stress in the shoulders very effectively in a short span of time.
- Brings courage, confidence, grace and peace.
- Tones abdominal organs.
Precautions
- To be avoided by those suffering high blood pressure and those recovering from any chronic illness.
7. Trikonasana: Triangle Pose
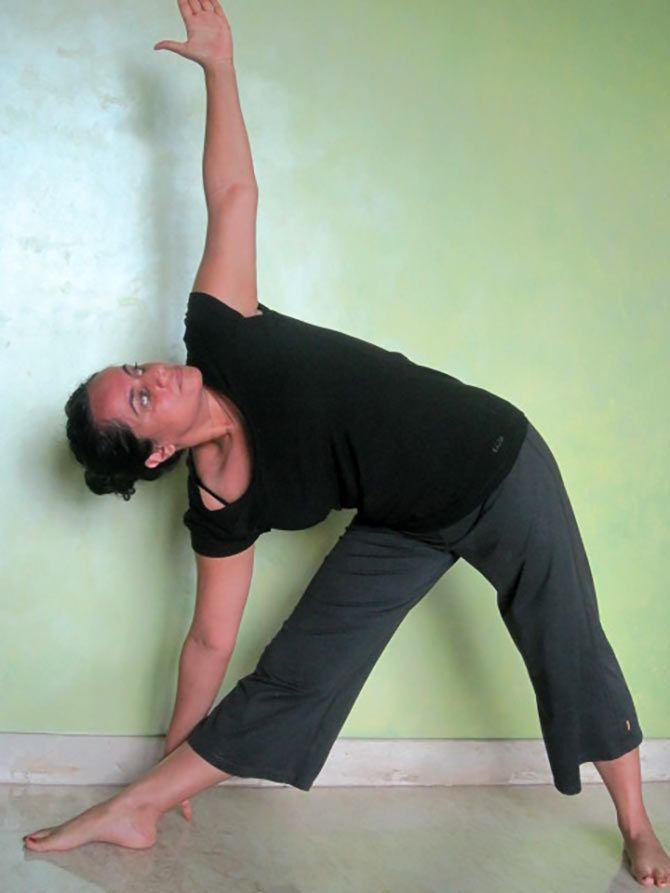
- Stand straight. Separate your feet comfortably wide apart (about 3 1/2 to 4 ft).
- Turn your right foot out 90 degrees and left foot in by 10 degrees.
- Now align your heel in one straight line
- Ensure that the soles of your feet are pressing the ground and the weight of your body is equally balanced on both the feet.
- Inhale deeply and exhale slowly, as you bend your body to the right, downward from the hips.
- Do not let your shoulders come forward, instead they should be in the same line as the hips, this is the most common mistake.
- Raise your left and fingers towards the ceiling, hand to come up in the air while your right hand and lengthen your arm in line with the tops of your shoulders, the right hands either comes to the ground behind your right foot, or rests on your shin or higher.
- Roll your left shoulder back and look up at your finger tips. If your neck hurts, low towards the ground.
- Make sure that your body is bent sideways and not backward or forward. Pelvis and chest are wide open.
- Stretch maximum and be steady, as you press your big toe into the ground.
- Do not let your right knee pop forward, but draw both knees into your quadriceps.
- Keep taking in long deep breaths. With each exhalation, relax the body more and more.
- Just be with the body and the breath. Stay for 5 breaths.
- Inhale, come up slowly, bring your arms down to your sides, and straighten your feet.
- Repeat the same on the other side.
Benefits
- Tones the legs, knees, ankles, arms, and chest.
- Stretches and opens the hips, groins, hamstrings, and calves; shoulders, chest, and spine.
- Increases mental and physical equilibrium.
- Reduces anxiety, stress, and back pain.
Precautions
- Avoid if you are suffering from migraine, diarrhea, low or high blood pressure.
- Those with high blood pressure may do this pose by looking to the ground.
8. Vriksasana: Tree Pose
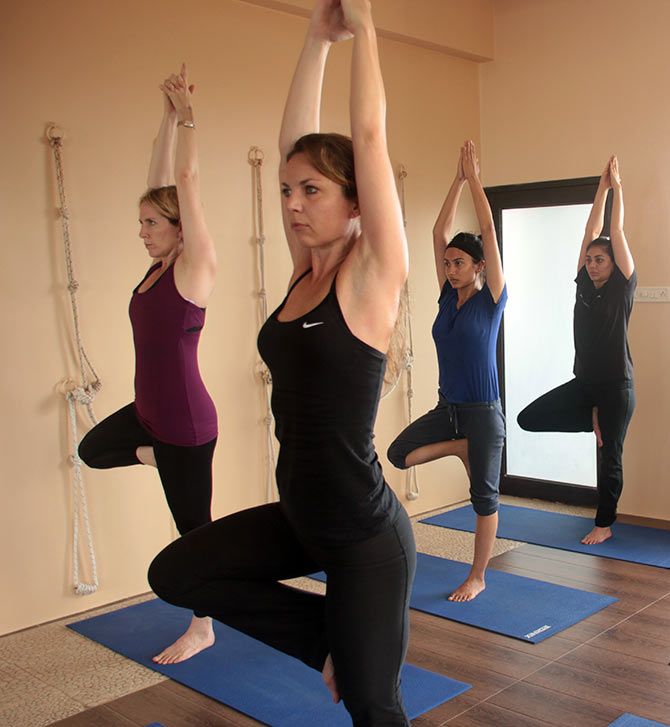
- Stand tall, with your arms by the side of your body.
- Bend your right knee and place the right foot high up on your left thigh.
- The sole of the foot should be placed flat and firmly near the groin.
- Make sure that your left leg is straight.
- Find your balance by placing your foot firmly on the ground.
- Keep your eyes on the ground until you find balance.
- Once you are well balanced, take a deep breath in, gracefully raise your arms over your head from the side, and bring your palms together in 'Namaste' (hands-folded position).
- Look straight ahead in front of you, at a distant object, find a focal point.
- A steady gaze helps maintain a steady balance.
- Ensure that your spine is straight.
- Your entire body should be firm, if able draw your knees up into your thighs to better your alignment.
- Take slow and long deep breaths.
- With each exhalation, relax the body more and more.
- With slow exhalation, gently bring down your hands from the sides. You may gently release the right leg.
- Stand tall and straight as you did at the beginning of the posture.
- Repeat this pose with the left leg off the ground on the right thigh.
Benefits
- This pose stretches the legs, back and arms, and invigorates the entire body
- It brings balance and equilibrium to the mind and body.
- It helps improve focus and concentration.
- It makes the legs strong, improves balance, and opens the hip muscles.
Precautions
- Avoid if you have a migraine or insomnia.
9. Bhujangasana: Cobra Pose (half or full)
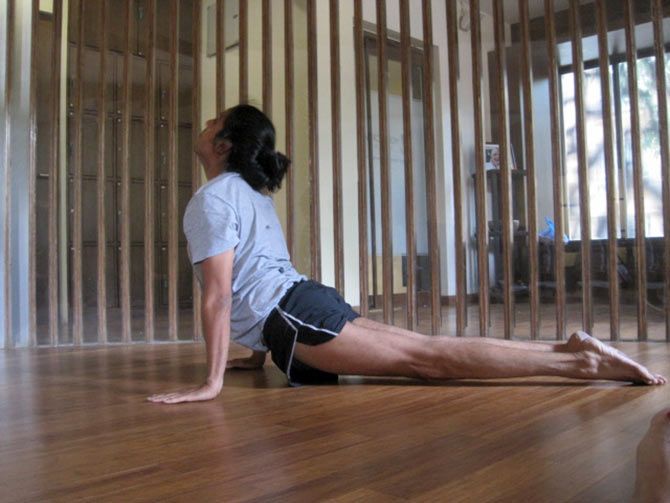
- Lie on your stomach with your toes flat on the floor and forehead resting on the ground.
- Keep your legs close together, with your feet and heels lightly touching each other.
- Put your palms next to your chest, with your fingertips inline you're your chest, pals facing downward and elbows in.
- Taking a deep breath in, and slowly lift your head, chest, torso and abdomen completely off the ground, with the support of your arms.
- Lock your elbows, look back, and roll your shoulders back, bringing your shoulder blades together.
- If you cannot do this, just lift your shoulders and head off the ground, using your spinal muscles to lift, keep your palms on the ground for basic support.
- Be aware of your breathing.
- While breathing out, gently bring down your abdomen, chest and head and forehead back to the floor.
Benefits
- Opens up the shoulders and neck muscles.
- Tones the abdomen.
- Improves flexibility of the upper and middle back.
- Expands the chest and lungs
- Improves blood circulation.
- Builds confidence
- Reduces fatigue and stress.
- It is also good for respiratory disorders such as asthma. (But do not practice this yoga pose during an attack).
Precautions
- Pregnant women in their latter trimesters those who have just had an abdominal surgery should avoid this pose.
- If you have a back problem, perform this pose under proper guidance.
10. Halasana: Plough pose
- Fold your mat into half and then half again.
- Place two folded blankets on your mat, roughly matching the size of your mat.
- Lie on your back with your shoulders about four inches below the top of your mat, with your arms beside you, palms downwards.
- As you inhale, use your abdominal muscles to lift your feet off the floor, raising your legs vertically at a 90 degree angle.
- Allow your legs to sweep in a 180 degree angle over your head till your toes touch the floor. Your back should be perpendicular to the floor. This may be difficult initially, but make an attempt for a few seconds.
- Do this slowly and gently. Ensure that you do not strain your neck or push it into the ground.
- Hold this pose and let your body relax more and more with each steady breath.
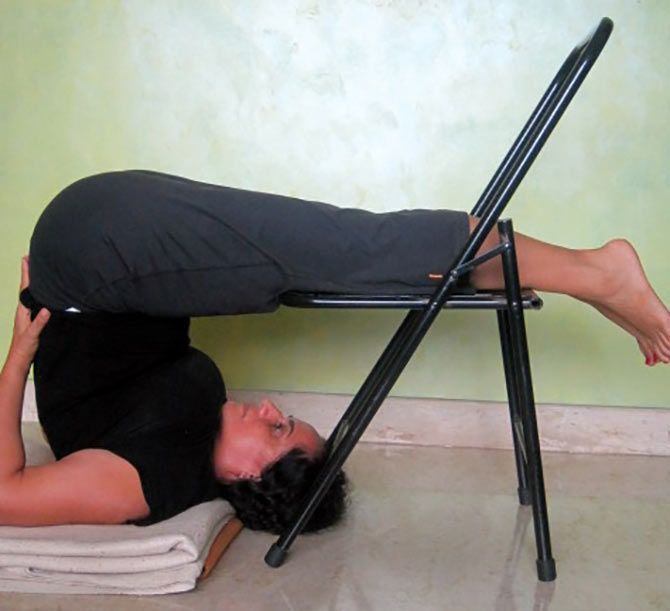
Half Halasana:
- Alternatively, do this with a chair or a bed behind you, and lift your legs and place your knees on the chair or bed.
- Hold your back, and make sure your spine in straight as your legs and knees rest on the chair or bed.
- Your neck should not feel strained.
- Continue to breathe normally and supporting your hips and back with your hands, lift them off the ground.
- After about a minute (or 30 seconds for beginners), you may gently bend your knees and bring your legs down.
- Avoid bringing your body down with a thud
Benefits
- Strengthens and opens up the neck, shoulders, abs and back muscles, and arthritis in the back.
- Removes all compression in the lower back.
- Calms the nervous system, reduces stress and fatigue.
- Stimulates the thyroid gland, strengthens the immune system.
- Helps women during menopause.
- Stimulates abdominal organs.
- Great for migraines and people with a tendency for high blood pressure.
Precautions
- Avoid practicing if you have injured your neck
- Ladies should avoid practicing during pregnancy and during the first two days of the menstrual cycle.
- Consult a doctor before practicing Plough Pose if you have suffered from spinal disorders in the recent past.
11. Shavasana: Corpse Pose
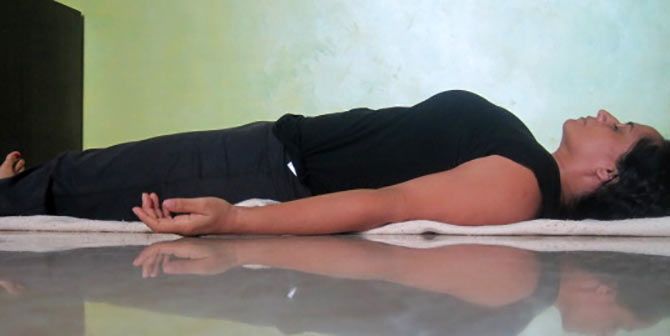
- Lie flat on your back on your mat, and close your eyes.
- Keep your legs comfortable apart and let your feet and knees relax completely, toes facing to the sides.
- Place your arms alongside, yet a little spread apart from your body. Leave your palms open, facing upward.
- Taking your attention to different body parts one by one, slowly relax your entire body.
- Keep breathing slowly, gently, deeply and allow your breath to relax you more and more.
- The incoming breath energises the body while the outgoing breath brings relaxation and detoxes the body.
- Just be with the body and the breath, and surrender the whole mind and body. Make sure you don't fall asleep.
- After some time, about 1-2 minutes when you feel fully relaxed, keeping your eyes closed, slowly roll onto your right side, into a fetal position. Lie in that position for about 20 seconds.
- Then, taking the support of your right hand, gently sit up into a seated cross-legged position.
- Keep your eyes closed and take a few deep breaths in and out as you gradually become aware of your environment and the body.
- When you feel completely aware, slowly and gently open your eyes.
Benefits
- This posture brings a deep, meditative state of rest, which helps in restoring and rejuvenating the entire body, and releasing stress.
- This posture is the perfect way to end a yoga session
- It helps reduce blood pressure, anxiety, and insomnia.
- This is an excellent way to ground the body.


